Monday, February 20, 2012

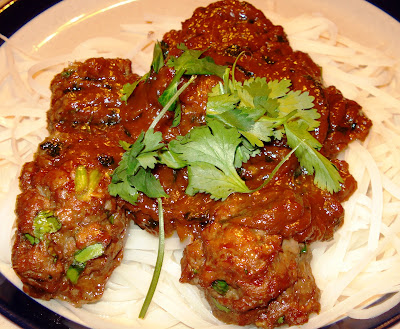
Thai Meatballs With Peanut Sauce

I am a fanatic about Thai food. I drool just thinking about the exotic cuisine's wide pallet of intense flavors, the spicy curry dishes that meld with sweet, creamy coconut milk. Savory and sweet dishes, noodles or rice dishes-- there are so many wonderful choices when it comes to Thai food. Unfortunatly I haven't utilized my Asian cookbook very much because of all of the daunting, expensive, tedious ingredients that Thai food requires. However I found an easy Thai-inspired dish on a very helpful blog called Meal Planning 101 that is delicious, and I didn't have to search very far for the few Thai ingredients needed. I found them right in my local grocery store's Asian section. When I found this recipe I knew this was what I would make Paul for his birthday dinner! We both loved its creamy peanut and coconut sauce that was spicy and sweet over the flavorful, moist meatballs that were processed in the Marinade Express and cooked in the oven to perfection.

Thai Meatballs With Peanut Sauce
Adapted from Meal Planning 101:

Ingredients:

Meatballs:
1 lb lean ground beef
2 tbsp hoisin sauce (found in the Asian section of a grocery store)
2 tbsp bread crumbs
3 green onions, finely chopped
1 tbsp fresh cilantro, minced
1 egg
3 cloves garlic, minced
2 tsp fresh grated ginger
1 tsp sesame oil

Peanut Sauce:
1 cup light coconut milk (found in the Asian section of a grocery store)
1/3 cup hoisin sauce
2 tbsp soy sauce
2 tbsp peanut butter (smooth)
2 tbsp fresh cilantro, minced
1 tbsp  fresh ginger, grated
1 zest of a lemon
1/8 tsp crushed red peppers flakes

Serve:
Serve over Vermicelli rice noodles
Garnish with fresh cilantro

Directions:

1) Prep the ground beef in The Marinade Express. I chose to use Sesame Ginger MX Seasoning since I was using this beef for Thai food. Carefully place the beef on one side of the divider, let it rotate for 3 rotations. Stop it when the beef is out of the water. Let it rest for 5 to10 minutes atop the divider to drain out the excess water. Open the Marinade Express drum and carefully remove the beef. It becomes extra delicate after being processed in the Marinade Express.

2) Preheat the oven to 400 degrees. Prepare 2 baking sheets with tin foil and nonstick spray for an easy clean-up.

3) In a large bowl mix in all meatball ingredients.You may need to use your hands to really make sure that everything gets mixed together well.

Note: If you have leftover ginger, put it in a sandwich bag and pop it in the freezer. It keeps really fresh this way and it makes it easier to grate.

4) Form the meat mixture into 1 and 1/12 inch balls and space them out on the baking sheets. Pop the meatballs into the fridge to chill while you prep for the sauce. Once all of the sauce ingredients are in the saucepan pop the meatballs into the oven. Bake for 14-17 minutes.

5) Boil water for the rice noodles. Let the noodles boil for 3 to 5 minutes, or until soft.

6) For the Sauce: combine all sauce ingredients in a medium sauce pan over medium-high heat. Stir all ingredients together. Let the sauce come to a boil , then turn the heat down and let it simmer until the meatballs are done.

7) Remove the meatballs from the oven. Place the noodles on a plate, place 3 to 4 meatballs on the noodles, add sauce, and garnish with cilantro. Serve immediately!

Sautéed Asparagus and Mushrooms

Recently, I haven't been as disgusted by asparagus as I used to be. I decided to start experimenting with it to find ways that I might like it more. I was pleasantly surprised with this dish. The crisp, sharp crunch of the asparagus marries perfectly with the spongy, soft texture of the buttery mushrooms.

Sautéed Asparagus With Mushrooms

Ingredients:

2 tbsp butter
2-3 cloves of garlic, minced
1 small bunch of asparagus, cut 
6 oz of baby bella mushrooms, sliced
salt
pepper

Directions:

1) In a medium sauce pan melt the butter. Add the garlic, cook just until it is browned. 

2) Add the mushrooms, cook 2-3 minutes, until partially browned.

3) Add the asparagus, cook until warmed but still crunchy.

4) Salt and pepper to taste.

5) Serve and enjoy. Quick, easy, healthy!

Thursday, February 16, 2012

An Untraditional Valentine's Day Dinner

As I have established, in my previous post, I am not a big fan of Valentine's Day, but I like to enjoy it in some form as a way to remember to love the little things in life. To celebrate I made what I would consider to be an untraditional Valentine's Day dinner.

Mushroom Soup
(Image)


Chocolate Covered Oranges

Mushroom Soup - Untraditional Valentine's Day Dinner


For the first course I made mushroom soup. This soup is fast, creamy, healthy, and surprisingly filling. Being a mushroom lover I use about 16 ounces when the recipe calls for 8 ounces.In my opinion, the more mushrooms the better. I also use button mushrooms because they are the cheapest but any mushroom that you choose would be wonderful. I adapted this recipe from my favorite soup book, Soup's On,  by substituting skim milk for half-and-half to make this soup a little more figure-friendly.


(Image)
Mushroom Soup
Ingredients:

4 tablespoons butter
4 garlic cloves, minced
1 onion, sliced
8-16 ounces fresh mushrooms, thinly sliced
1/4 cup flour
1/4 cup beef broth
2 cups skim milk
1/4 teaspoon ground nutmeg
1 bay leaf
salt
freshly ground black pepper

Directions:

Melt the butter in a heavy sauté pan over medium-high heat. Once melted add the garlic, just long enough to brown it, careful not to burn it. Add the onion and cook until golden brown. Add the mushrooms and cook until golden brown. Stir in the flour, then slowly add the stock, stirring constantly.

Heat the milk in the microwave for about 20 seconds. Add the milk, nutmeg, mushrooms, bay leaf, and salt and pepper to taste. Let the soup simmer over low heat until the flavors marry, about 10 minutes. Don't let the soup boil! Remove the bay leaf and serve immediately.


Cheeseburger Pie - Untraditional Valentine's Day Dinner

For proof that I am a major foodie and love to cook, I had saved this recipe, along with many others, from my cooking class that I took in high school. I cannot give proper credit to the recipe's creator because unfortunately I don't know where my teacher found this recipe. It is a fun, easy, satisfying dish to make.

Cheeseburger Pie

Cheeseburger Pie
Ingredients:

1 1b lean ground beef
1 medium sized onion
salt to taste
pepper to taste
3/4 tsp Italian seasoning
1 6oz can tomato paste
1 can crescent rolls
4 slices of cheese of your choice (we used mozzarella)
1/2 green pepper, chopped
Pasta sauce

Directions:

1) Process the ground beef meat in the Marinade Express using an unflavored or Italian MX seasoning mix. Remember, the ground beef only needs to be processed for 3 rotations. Watch carefully and stop the rotation while the beef is resting on the divider, out of the water. Let it stand for 5 minutes to help drain the water out of the beef. Remove the beef carefully.

2) Brown the beef. You will notice that the beef is less greasy because the short time in the Marinade Express has helped to break down the fat.

3) Blend in the onion, salt, pepper, Italian seasoning, and tomato paste.

4) Pat the crescent rolls into a 9 inch pie pan or casserole dish.

5) Place ground beef mixture on top of the crescent rolls, spreading it out. Top it with the cheese.

6) Bake at 350 degrees for 25-30 minutes, or until the crescent rolls are golden brown.

7) Heat up the pasta sauce and serve on the side to dip the cheeseburger pie into.

8) Sprinkle the green peppers on top of the Cheeseburger Pie for a splash of color and a crunch. Serve and enjoy!


Chocolate Covered Oranges - Untraditional Valentine's Day Dinner


I admit it, I am a chocoholic.Paul loves oranges, so for dessert I thought I'd combine the two. I used the convenient Baker's Dipping Chocolate. You can microwave it and it is ready for dipping use in seconds. The oranges were chocolaty, fruity, and dessert you can feel good about.

Chocolate Covered Oranges

Ingredients:
2 oranges
1 container of Baker's Dipping Chocolate

Directions:
1) Follow the heating directions on the container. I used the microwave method for convenience.

2) Peel the oranges. Use a paper towel to dry each segment.

3) Dip half of the segments into the chocolate. Place on waxed paper to dry. We were too anxious to wait 15 minutes for them to harden in the refrigerator, so we ate ours at room temperature. They were delicious!

I hope everyone had a wonderful and delicious Valentine's day!

Tuesday, February 14, 2012

Valentine's Plans

Happy Valentine's Day Everyone!


I am not a big fan of Valentine's Day because the media hypes it up too much and there is too much pressure to make it filled with chocolates, flowers, and red hearts. However, I do like to celebrate Valentine's Day in some form. It is a day to celebrate Love and to realize all of the little things there are to love in life. Like the beautiful light dusting of snow we received yesterday; it wasn't so much snow that we had to deal with shoveling but it was enough to add a magical white layer to the earth.

(Image)
A preview of what I will be making for an untraditional Valentine's dinner tonight: Hamburger Pie, Mushroom Soup, and Chocolate Dipped Oranges. Of course I had to include chocolate in my menu; I am a girl after all. I look foward to sharing with you how the meal tonight turns out. I know I am excited to eat it!

Happy Valentine's Day; take note of all of the things you love in life!

Sunday, February 12, 2012

Turn A Purse Into A Creative Wall Decoration

When one of my old roommates was moving out of the house she was gathering together items she wanted to get rid of. One of the items was a purse with scenery of Venice, Italy decked out in sparkly rhinestones and big black handles. I loved the look of it but wouldn't want to use it as a purse because of the uncomfortable bulky plastic handles. Yet, I didn't want to discard it either because I have a personal attachment to Venice; I spent a few days there when I was abroad.
Enjoying A Ride On A Gondola

It remained hidden in my closet untouched for quite a while until I finally had an idea of how to display it on my wall. I went to Hobby Lobby and found a hook that compliments the purse and found the perfect spot to hang my Venice purse, right next to the Venice shadowbox I had made to display a masque I had bought as a souvenir. I hung the hook and stuffed the purse with tissue paper so it looks like it is full. It was the perfect addition to my wall, not to mention a cheap and resourceful decoration. I enjoy the sparkle and character it brings to my room.
The Hook
The Venice Purse
The Results


Soon after I hung the purse my other roommate gave me a wire Eiffel tower art piece that I hung beside the purse. My wall was complete. It is still my favorite wall to look at in my room. It is unusual, artistic and shows some of the places I have traveled to.


My Favorite Wall In My Room
What kind of purse do you not like to use as a purse but can't part with because of its beauty? Would it look stunning on your wall? 

Saturday, February 11, 2012

Italian Pasta with Chicken and a Side of Skier's Thumb

Exactly a week ago I made Italian pasta with chicken for dinner. I had it ready right as Paul got off work. After dinner we were to go to Chestnut Mountain just outside of Galena, Illinois for a night of downhill snow skiing. Being a lover of all things with cream cheese I had decided to try out the Philadelphia Cooking Cream I found in the store. It was an easy, quick way to add a delicious sauce to a pasta dish. I used the Italian Cheese and Herb flavor. As we devoured our Italian pasta with chicken, little did we know that later in the evening we would have a side of "skier's thumb".
(Image)

We arrived at Chestnut at about 6:30pm and began skiing down the various ski runs, enjoying the rush of adrenaline, then relaxing as we took the lifts back up the runs. We were having a wonderful ski night; the snow wasn't too icy considering our Midwest conditions for skiing, and it was an exceptionally warm night in the beginning of February. At 11:30pm we were trying to get our last couple of runs in before Chestnut closed at 12. We were skiing down our favorite run called Crazy Horse when all of a sudden I saw Paul sprawled on the snow. One ski was above him and the other one below. Paul is an advanced skier; he skis black diamonds in Colorado every year, so when he doesn't get up right away I know something is wrong. His first thought was that he broke his thumb. Thankfully we were close to the bottom of the run. I helped him get his skis back on and we made it down to the bottom and found the ski patrol. At the base of his thumb was a huge bulge. Our guess was that it was popped out of its socket but ski patrol said it looked like a case of "skier's thumb".

Hoping the Doc at the ER in Dubuque would be able to answer our questions of what "skier's thumb" is,  we were in the hospital until 2:30am and left with a heavy-duty splint, a prescription for pain medicine, and a note to call the orthopedic doc on Monday to take a look at it. When Monday came rolling around Paul found out that his thumb was dislocated with a fracture that fragmented the bone in two spots, requiring surgery to fix. Apparently this type of accident is common among skiers; hence the nickname, "skier's thumb."

Paul's surgery was successful. He now has two permanent metal pins holding his bone fragments together. Currently he is learning to perform daily activities with one hand until he has recovered six weeks from now. Thankfully his accident was fixable with surgery and some healing time. Despite Paul's accident we still had a great night skiing and enjoyed the Italian pasta with chicken dish.

Now for the recipe you've been waiting for...


Italian Pasta with Chicken


Italian Pasta with Chicken
Ingredients:

1 T Garlic
1 tsp butter
2 chicken breasts processed in the Marinade Express
1 container of Italian Cheese and Herb Philly Cooking Cream
Noodles (eyeball it to how much pasta you like in your dish)
1/2 bag of frozen broccoli
2 cups of frozen peas
2 hand-fulls of fresh spinach

Directions:

1. Cut the chicken that has been processed in the Marinade Express (using either the unflavored or Italian  MX seasoning mix) into bite-sized pieces.

2. Begin boiling the pasta in water. Boil until the noodles are tender.

3. In a large pan cook the garlic in butter just until the garlic is browned.

4. Add the chicken. Keep stirring so the chicken cooks evenly.

5. Add the frozen broccoli and peas and fresh spinach. Cook until the vegetables and chicken are cooked through.

6. Add the container of Italian Cheese and Herb Philly Cooking Cream to the pan. Make sure the sauce evenly coats the mixture and is melted. Serve immediately.

This dish is quick, easy, creamy, and healthy. The best part about it is that you can use whatever kind of frozen veggies you have on hand or fresh veggies, or any kind of meat. There are endless possibilities. I will be testing out more variations of this recipe with the Philly Cooking Cream, but I will omit the side of skier's thumb.

Thursday, February 2, 2012

Experiencing the Marinade Express' Big Sister in a Local Restaurant

My lovely parents traveled the two hour trek from Janesville, Wisconsin to Dubuque to visit me on Friday. Usually we enjoy our lunch at one of our fabulous local restaurants in Dubuque. This time we drove about 45 minutes to McOTTO's Family Restaurant in Anamosa, Iowa to have some lunch prepared for us in the  Marinade Express' big sister which is a larger, commercial version. McOTTO's has had the vacuum tumbler unit for many years, only they have a much bigger unit than I use in my kitchen. When we arrived my Dad explained that McOTTO's had one of the commercial-sized Marinade Express units for years; tragically McOTTO's had a fire. Once they rebuilt the restaurant they purchased another commercial unit to continue to prep their chicken in it.

The restaurant has a wonderful family style atmosphere. It is welcoming, airy, and colorful with clean-cut woodwork and old movie pictures. Their menu has a variety of choices from sandwiches, salads, Mexican, "Oodles of Noodles", burgers, chicken, and Happy Joe's Pizza. Since my dad was certain that they used the commercial-sized vacuum tumbler to prep their chicken, all three of us ordered chicken dishes. I got the Chicken Tortilla Wrap, my mom the Cajun Chicken, and my dad the Chicken Cordon Bleu Sandwich. In my family we all order different dishes so each of us can sample a variety of everything. All three of the chicken dishes were exceptionally delicious. The chicken was moist, tender, and plump. We could tell that the chicken had been processed in the vacuum tumbler.

After we ate our lunch my Dad asked our waitress if we could see the manager. The manager was delighted to find out that we weren't making a customer complaint, but a compliment on their chicken. We asked if we could see the tumbler unit in the kitchen, explaining that we were the manufacturers. She took us to the kitchen while telling us how much they love working with the vacuum tumbler. "It really makes a difference in our chicken; we get compliments from customers all of the time," she explained. I enjoyed the opportunity to see one of my dad's machines in the setting of a commercial kitchen. It was nice to see that it was being used in such a clean, nice restaurant where people notice the difference it makes in the food they eat.

One of the Chefs Checking the Gauge


The Commercial-Sized Unit

The Pump that Draws the Vacuum


Nestled in the small town of Anamosa, Iowa, McOTTO's is a popular, versatile restaurant that is using the larger, commercial version of the Marinade Express to help prepare their delicious dishes. The staff is welcoming; the prices are reasonable. I would recommend that you check out McOTTO's. You'll love the food, especially the chicken!